|
|
本帖最後由 wil-wil 於 2009-6-5 23:37 編輯
剛剛在網海度游下游下,見到呢個網址.
詳細內容未看真,希望有參考價值.
http://www.venhaus1.com/diymains.html
VH Audio Flavor 4 Power Cord [size=+2]The Objective:[size=+1]To construct top-notch, Audiophile-quality power cord without breaking the bank. [size=+2]Why use the new VH Audio Wire vs. my previous recommedation of Belden 83802?
*************************My prior design based on the Belden 83802 wire sounded very, very good. However, the more I thought about it, the more I realized that certain parameters could be tweaked, and I could produce an even better sounding power cord. The only problem is that I couldn't find anybody that sold the type of cable I had envisioned.
So I manufactured my own cable... Here are the details: * Two 12 AWG stranded conductors for low resistance. The rated maximum continuous current capacity for 12 AWG copper wire is in excess of 20 amps, which is more than enough capability for our application. * Each conductor contains 19 strands of .0188" bare copper wires (about 25 AWG) for a total AWG of 12 for each conductor. The higher strand count than the 83802 increases the surface area for better contact when the connectors are screwed to the wire. * FEP Teflon insulation of the individual conductors AND outer jacket. Teflon is about as close to the "Holy Grail" of dielectrics as it gets. * 100% shield coverage. This cable has both a foil AND braided shield, which effectively reduces RFI/EMI. This is important for keeping grunge out of the cable, but even more importantly to keep it localized within the cable and harmlessly drained to ground. * The entire braided shield is about 12 AWG, providing a low impedance path to ground. * The lay length (twists) of this new cable's twisted pair is 1" (12 twists per foot) vs. the Belden that has 4 twists per foot. This provides excellent RFI/EMI rejection, and also reduces the inductance (raises capacitance) vs. the 83802. * I have also tweaked a few other specs of my new wire for further improvement in sound quality. * A cryogenically treated version of the Flavor 2 is now available.
[size=+1]All parts to make my designs may be found HERE
[size=+1]If you aren't into the "DIY thing", I now sell all my power cable designs fully assembled. The cords or parts to make the cords may be purchased HERE
[size=+3]Design
************In this design, it is very important to place a separate safety ground outside the twisted pair conductors to decrease the capacitive coupling between the hot lead and the safety ground (vs. a safety ground within the hot/neutral conductor bundle). This may minimize the chance of leakage current - a GOOD thing :-) [size=+1]. By spiralling the safety ground in the opposite direction of the twisted conductor pair, we further mitigate the effects between the hot and safety ground. Something I found to be very interesting was that no ONE type of construction method sounded best on all components. The components I used seemed to prefer one method or another. Please be sure to follow the right recipe for your component, in order to get full performance from these power cords. Lastly, after extensive listening tests, it seems these cables need to "cook" for about 100-200 hours to reach optimum performance. [size=+2]Parts Required:
********************* * VH Audio 12 AWG (Shielded) Teflon Cable
WattGate, Furutech or Oyaide IEC connectors
WattGate, Furutech or Oyaide Male AC connectors
* Expandable Nylon Sleeving * You need about 20% more than the length of your cable to account for linear shrinkage, as the techflex expands.
* Teflon Insulated 12 AWG Stranded Copper Wire (order 15% more than the length of your cable, to account for the shrinkage when spiraling around the cable). * 3:1 Heat Shrink Tubing [size=+3]Construction:
***********************This cord is relatively easy to make- especially when compared to the sheer torment of making the DIY Cat5 Cables :-P
[size=+2]Flavor #1 (best with grounded digital components) 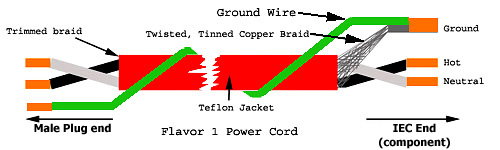
Flavor 1 Power CordStep 1: Cut the shielded cable to desired finished length.
Step 2: Strip about 1-1/4" of the outer Teflon jacket off the ends. Be careful not to nick the conductors!
Step 3: Carefully "comb out" the braided shield on ONE end of the cable, in effect "unbraiding" it- then twist the braid together tightly to form your shield drain wire.
Step 4: On the SAME end of the cable, trim both conductors and the shield drain wire back so they are an appropriate length to fit nicely into the IEC plug without excess wire.
Step 5: Strip the wire enough to connect the conductors (hot and neutral) to the appropriate terminals on the IEC plug.
Step 6: Secure the (formerly braided) shield drain wire AND the 12 AWG safety ground wire to the ground on plug.
Step 7: On the other side of the cable, completely remove the braided shield up to beginning of the insulation on that end.
Step 8: Note the manner in which the conductor pairs are twisted within the cable (clockwise or counter clockwise).
Step 9: Starting from the IEC end, spiral the 12 AWG safety ground wire around the cable jacket in the opposite direction as the twisted conductors within the cable. Do this until you get to the male connector. The spiral ratio should be about 1 complete turn every 4".
Step 10: Secure the spiralled wire about 4" from each end with heatshrink. next step.
Step 11: Starting at the end with the IEC plug, tightly secure the spiralled ground wire by using 2" pieces of 1/2" heatshrink every 6" or so. The object here is to tightly secure the ground wire so it is not flopping around when the cable is bent. Continue until you get to the end of the cable's Teflon outer jacket (you should remove the rubber band or tape before you secure the last piece of heat shrink).
Step 12: If you plan on using flexible Nylon Sleeving, now is the time to cut an appropriate length and slide it over the cable. Now you may use additional Heat Shrink to join the plugs to the sleeving by sliding onto the cable.
Step 13: Eyeball the length you will need for the conductors to fit into the male plug without excess, and connect the conductors (hot and neutral), to the appropriate spade. Also connect the safety ground at this time. DO NOT connect the braided shield here- you should have already trimmed back the shield in Step 7.
Step 14: Plug these babies in!!! (after using a continuity tester to make sure you didn't mess up- see disclaimer) [size=+2]Flavor #2[size=+1] (this version sounds best with amplifiers and most other grounded analog components) 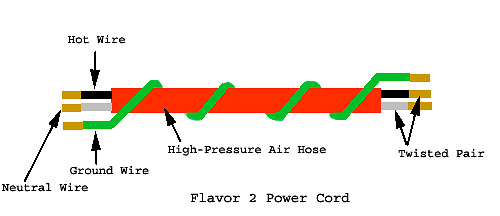
Flavor 2 Power Cord* Use the unshielded version of the VH Audio Wire. This lowers the capacitive coupling even further between hot and safety ground * there is > 1/8" spacing between the safety ground and inner conductors by using the heavy walled high-pressure air hose as a spacer. Combined with the shield removal and the counter-spiralled ground, I believe this design may achieve the absolute lowest capacitive coupling between the inner conductors and safety ground. * The "end product" has a diameter of about 5/8" and looks REALLY, REALLY, SERIOUS- especially with the nylon sleeving over it. Your friends will ask: "Why do you have garden hoses attached to your stereo components?" Additional parts:
3/8" I.D. X 5/8" O.D. Synthetic Rubber Hose available HERE. ** Order about 20% more ground wire than the length of your cable, to account for the length shrinkage that occurs when spiraling around the rubber hose. Also get about 30% more techflex than the length you intend to make... Step 1: Cut the cable to desired finished length.
Step 2: Cut the Air Hose about 6" shorter than cable length in Step 1
Step 3: Feed the wire through the air hose until about 3" protrudes from each end of the hose.
Step 4: Strip an ample amount of insulation from each wire on the cable and connect to the Male plug at the appropriate spades (black is usually "hot" and "white" is neutral).
Step 5: Connect the 12 AWG Teflon ground to the ground spade on the male plug.
Step 6: Note the manner in which the conductor pairs are twisted within the cable (clockwise or counter clockwise).
Step 7: Starting from the Male end, spiral the 12 AWG safety ground wire around the outside of the tubing in the opposite direction vs. the twisted conductors within the cable. Do this until you get to the end of the tubing. The spiral ratio should be about 1 complete spiral per 4" - 6" or so.
Step 9: Secure the spiralled wire to the hose with a thick rubber band or tape temporarily while we complete the next step.
Step 10: Starting at the end with the male plug, tightly secure the spiralled ground wire by using 1 1/2" pieces of the heatshrink every 6" or so. The object here is to tightly secure the ground wire so it is not flopping around when the cable is bent. Continue until you get to the end of the tubing (you should remove the rubber band or tape before you secure the last piece of heat shrink).
Step 11: If you plan on using flexible Nylon Sleeving, now is the time to cut an appropriate length and slide it over the cable. Now you may also use the additional Heat Shrink to join the plugs with the sleeving/hose by sliding onto the cable.
Step 12: Eyeball the length you will need for the conductors and the safety ground to fit into the IEC plug and trim the wires back.
Step 13: Strip the wires and terminate to appropriate terminals on the IEC plug. [size=+2]Flavor #3[size=+1] for use with all components that don't require a safety ground. This was best for my non-grounded digital components 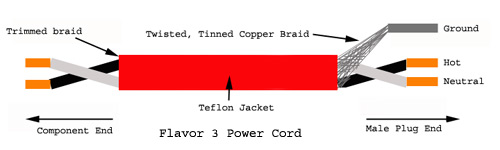
Flavor 3 Power CordSame as "Flavor 1" except we don't use a safety ground. Just use the raw VH Audio Shielded cable (no need to use or wind a 12 AWG safety ground). You still must "comb" and then twist the braiding at the source end (male plug) and connect it to ground. [size=+3]The Sound
(for flavors #1, #2 and #3)
*******************So what do they sound like? Does my stereo now go to "11"? (for "Spinal Tap" fans out there)
Here is what others have said after making or buying these power cables: Power Cord Reviews. I never thought power cables could make a significant difference in my system. I was wrong............. Good luck, and enjoy!
|
|


 發表於 2009-3-12 23:31


 發表於 2009-3-13 08:31