設為首頁fbYouTubeWhatsapp頻道IG

Post76.hk

搜索
12
返回列表 發新帖
樓主: rick_ccf

[投影機/幕] 請教AE4000調教

  [複製鏈接]

5

主題

249

回帖

0

精華

鉑金玩家

Rank: 10Rank: 10Rank: 10

積分
115121
發表於 2011-7-22 15:50 | 顯示全部樓層
Excellent colour, can you please share some of you calibration number?
pwong888 發表於 2011-7-22 12:47


I don’t mind to share my settings, but it would be mis-leading and it is very likely that it wouldn’t work for you.  This is because, in the world of front projection, the projected colors are affected by so many factors, including:

The screen – different material, brand, and model of the screen will affect the color performance.

The aging of the lamp – I have about 750+ hours on my AE4000.  Yours is probably very different.  The lamp’s hourage not only affect its brightness (i.e. the lamp gets dimmer over time) but also it will affect the color performance too.  For example, I used to adjust the white balance by boosting the Red Contrast a bit for every ~100 hours of use because, as the lamp ages, the lamp is running out of red faster than green and blue (of course, I “assume” that my colorimeter still behaves consistently, and the color drifting is mainly due to the lamp; but in fact, accuracy of colorimeter can drift over time).

Viewing environment – the level of ambient light, the color and reflectivity of the environment such as wall, ceiling, floor, furniture, etc. will all affect the colors reflected from the screen.

The source device – a specific set of settings is valid for a specific signal chain, i.e. “MTV3500 -> Onkyo 3007 -> AE4000”, because a different source device may introduce variations to the video signal (although they are all using HDMI to transmit digital signal).  For example, my blu-ray player requires a different set of settings in AE4000 for an optimal color performance.

Therefore, there is little or no value that you copy my settings into your AE4000.  It may be better than your current setup, but it is also very likely that you will find it causing worse picture quality.  You should take your own risks of doing so.

By the way, per your request, here is the detailed Picture settings in my AE4000 for watching HDTV using my MTV3500 (note: MTV3500 was set to output YCbCr, not RGB):

Picture Mode: Cinema 1
Contrast: -10
Brightness: +1
Colour: +1
Tint: 0
Sharpness: 0
Colour Temperature: -3
Dynamic Iris: Off
Advanced Gamma Adjustment for Y (10% - 90%): -10, -15, -20, -24, -28, -25, -24, -20, -16
Advanced Gamma Adjustment for R: 10% (-8), 70%(-22)
Advanced Gamma Adjustment for B: 10% (-12)
Contrast R/G/B: +17 / 0 / 0
Brightness R/G/B: -4 / 0 / +1
Frame Creation: Mode 1
Colour Management (Colour / Tint / Brightness):
- R: -13 / +2 / -1
- G: -20 / -18 / -6
- B: -2 / +1 / +11
- C: -22 / +24 / 0
- M: -15 / -7 / +7
- Y: -8 / -2 / -8
Detail Clarity: +3
Zappiti Pro 4K HDR Media Player
Pioneer UDP-LX500
Pioneer SC-LX901
JVC DLA-N5
JL Audio E110
PS Audio Power Plant P10

5

主題

43

回帖

0

精華

進階玩家

Rank: 4

積分
2927
發表於 2011-7-26 15:56 | 顯示全部樓層
本帖最後由 snakejoe 於 2011-7-26 16:00 編輯
I don’t mind to share my settings, but it would be mis-leading and it is very likely that it woul ...
dominickwok 發表於 2011-7-22 15:50


我都係用 ae4000, 請問用 "ColorHCFR" 點樣調教 gamma 同 color gamut 呢? 網上教學好多都只係教調色溫. thx.

8

主題

881

回帖

0

精華

高級玩家

Rank: 5Rank: 5

積分
4728

76-FC 藍寶石勲章

發表於 2011-7-26 16:06 | 顯示全部樓層
我都系用 AE4000, 不過我冇咩 Set 過, 只係 set 左 details clarity +7
BenQ W1070/OS 80/Pioneer LX-53/Yamaha 765/Marantz SR4600/NAD 326BEE/Cayin CDT17A/OPPO 93/Philips 7300/PS3/(F)Quad12L2/(C)B&W HTM62/(S,FH)Mirage Nanosat/(SW)M&K KX12/SFH-PX

5

主題

249

回帖

0

精華

鉑金玩家

Rank: 10Rank: 10Rank: 10

積分
115121
發表於 2011-7-27 13:01 | 顯示全部樓層
本帖最後由 dominickwok 於 2011-7-27 13:15 編輯
我都係用 ae4000, 請問用 "ColorHCFR" 點樣調教 gamma 同 color gamut 呢? 網上教學好多都只係教調色溫. ...
snakejoe 發表於 2011-7-26 15:56


To calibrate gamma is quite easy (what you need is patience).  After you take a full run of 11 measurements for 0% - 100% grayscale, the measured luminance (Y) for each of the 11 steps is shown in the row labeled “Y” (the big “Y”, not the small “y”).
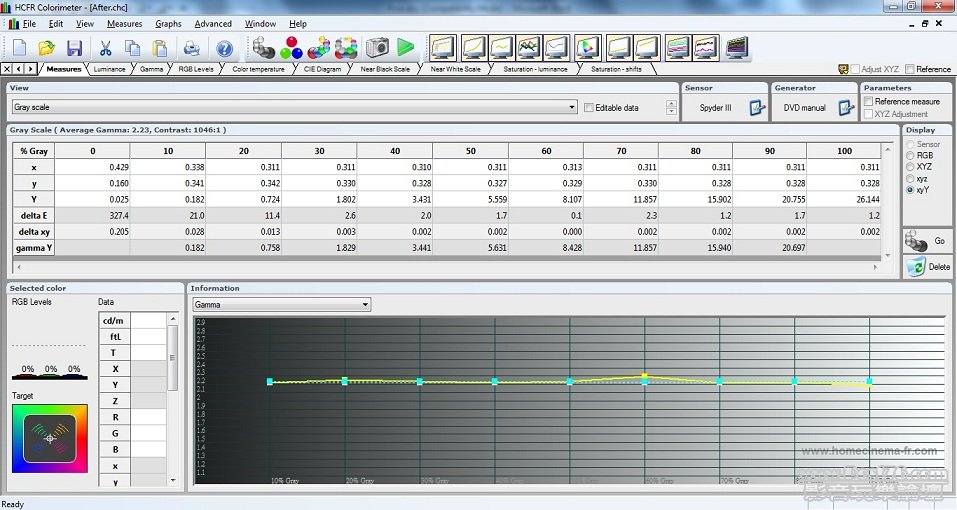
Gamma.jpg

The last row labeled “gamma Y” is the Y values that you need to achieve.  It is calculated based on (i) the measured luminance @ 100% white and (ii) your preferred gamma value (as defined in the “Advanced -> Preferences -> References” tab; the default value is 2.22 – which is suitable for a dark environment).  If "Y" comes very close to "gamma Y" for the entire range of 10% - 90%, you will find the Gamma graph is a flat horizontal line.

Then you use the “Advanced” mode of AE4000’s Gamma Adjustment function to increase or decrease the output at each of the 9 points (10%, 20%, …, 90%).  Do not adjust the Input point in horizontal direction; only adjust the Output in vertical direction.
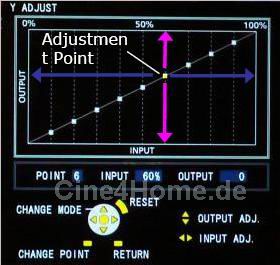
Gamma Adjustment.jpg

The goal is to make the measured “Y” value in each step matches with its target value of “gamma Y”.  It is easier to work from the high-end towards the low-end, i.e. start from 90% first; and then 80%, 70%, … etc.  But you need to be aware of two side effects:

(1) Changing output at a certain point may affect the luminance of the two adjacent points (this is an undesirable behaviour in AE4000).  For example, changing output @ 90% will also change the luminance @ 100% and 80%.  Since “gamma Y” is calculated from luminance @ 100%, this means changing output @ 90% will cause all the “gamma Y” values to be invalid.  Therefore, you need to do the following steps in several cycles:

(a) change output @ 90% to make “Y” comes close to its “gamma Y” (no need to be exact; just roughly the same is ok);
(b) do a full run of grayscale measurement to obtain a new set of “Y” and “gamma Y”;
(c) check if “Y” @ 90% matches closely with “gamma Y” @ 90%.

And then (a), (b), (c), (a), (b), (c) … etc. until you satisfy the result at step (c).

A short-cut method is to calculate the “gamma Y” @ 90% by yourself.  Assume your measured Y value @ 100% is 26.144.  Then the “gamma Y” @ 90% is calculated as:

26.144 * (0.9 ^ 2.22) = 20.697

Therefore, you can alternate between 100% test pattern and 90% test pattern quickly to adjust the output @ 90% properly.


(2) Another side effect is that, changing the luminance output using the Advanced Gamma Adjustment function may likely impact the grayscale.  So you will need to do a grayscale calibration again after you finish adjusting the gamma.

And adjusting grayscale may also impact the gamma again.  So, in the world of calibration, you need to understand the truth, “everything affects everything”; and you need to do the adjustment in multiple cycles.  Usually the amount of adjustment will be smaller and smaller from cycle to cycle so that eventually (if you have patience) you will settle in a “final” setting that you have nothing more to adjust.


To calibrate the color gamut of AE4000, you will need to first get some basic understanding about color calibration by taking a look at the following online resources:

Basic Guide to Color Calibration using a CMS:
http://www.avsforum.com/avs-vb/showthread.php?t=852536

But that is for reference only (at least to myself), because the color gamut of “Cinema 1” calibrated in this “traditional” way is not accurate for all the RGBCMY colors below the 100% saturation point (although the 100% saturation points for the colors can be calibrated to closely match with Rec. 709 standard).

To calibrate the color gamut of AE4000 “Cinema 1” mode, I used the following online resources:

Calibration Guide for using Epson CMS (so happen it applies very well to AE4000):
http://www.avsforum.com/avs-vb/s ... 166537#post16166537

Based on this guide, and the Excel spreadsheet that you can find in this guide, you can then use the “RGBCMY” mode of the Colour Management function to adjust the 3 aspects of color – saturation, hue, and brightness – for each RGBCMY color.  Inside the AE4000’s CMS:

Use the “Colour” control to adjust saturation
Use the “Tint” control to adjust hue
Use the “Brightness” control to adjust brightness

Important: Changing the setting for primary colors (RGB) may impact the grayscale (so you need to check the grayscale and gamma again).  Changing the grayscale is likely impact the secondary colors (CMY).  So it is recommended not to change all the RGBCMY colors at once.  First do the RGB first; and then fine-tune grayscale and gamma; and then do the CMY calibration.  You would want to achieve the final state that, a full measurement of grayscale, gamma, and color gamut, will suggest nothing to change - and then you're done.

Hope that helps.


One last thing – as in all TV & projector calibrations, unless you’re using $1,000,000+ worth of professional gear to do the job, there is little confidence that the end result is “absolutely” accurate, especially I’m using Spyder3TV colorimeter, which is generally not recognized by industry experts as being up-to-speed for color gamut calibration (but generally, for gamma calibration, which basically measures relative luminance performance of the display, Spyder3TV is quite good).  By the way, from a hobbyist’s perspective, it is already good enough for me.  Hope that you will enjoy also.

評分

參與人數 3威望 +23 收起 理由
billy997 + 10 精品文章
snakejoe + 3 精品文章
chhanthony + 10

查看全部評分

Zappiti Pro 4K HDR Media Player
Pioneer UDP-LX500
Pioneer SC-LX901
JVC DLA-N5
JL Audio E110
PS Audio Power Plant P10

5

主題

43

回帖

0

精華

進階玩家

Rank: 4

積分
2927
發表於 2011-7-27 14:22 | 顯示全部樓層
回復 14# dominickwok


    嘩, 超正o既解說. 收藏,收藏 .

5

主題

249

回帖

0

精華

鉑金玩家

Rank: 10Rank: 10Rank: 10

積分
115121
發表於 2011-7-29 13:08 | 顯示全部樓層

Screenshots

本帖最後由 dominickwok 於 2011-7-29 13:09 編輯

Here are some more screenshots (for your reference only - because the color and the overall picture quality is somewhat distorted by my camera, as well as your computer monitor):

Star Trek:

Star Trek 01.jpg

Star Trek 02.jpg

Star Trek 03.jpg

Star Trek 04.jpg

Star Trek 05.jpg

Transformers:

Transformers1 01.jpg

Transformers1 03.jpg

Transformers1 02.jpg

Transformers1 04.jpg

Transformers1 05.jpg

Transformers1 06.jpg

Iron Man 2:

IronMan2 01.jpg

IronMan2 02.jpg

IronMan2 03.jpg

Tron Legacy:

Tron Legacy 00.jpg

Tron Legacy 01.jpg

Tron Legacy 02.jpg

Tron Legacy 03.jpg

Tron Legacy 04.jpg

Tron Legacy 05.jpg

Tron Legacy 06.jpg

Tron Legacy 07.jpg

Pirates of the Caribbean: On Stranger Tides (preview in the Tron Legacy's BD):

Z Pirates of the Caribbean (Preview).jpg

評分

參與人數 2威望 +20 收起 理由
hit87761 + 10
chhanthony + 10 精品文章

查看全部評分

Zappiti Pro 4K HDR Media Player
Pioneer UDP-LX500
Pioneer SC-LX901
JVC DLA-N5
JL Audio E110
PS Audio Power Plant P10

62

主題

673

回帖

0

精華

黃金玩家

Rank: 9Rank: 9Rank: 9

積分
65703

76 榮譽忠義勲章

發表於 2011-7-29 22:59 | 顯示全部樓層
very gooood...好正
您需要登錄後才可以回帖 登錄 | 成為會員

本版積分規則  允許回帖郵件提醒樓主

重要聲明:本討論區是以即時上載留言的方式運作,Post76玩樂討論區對所有留言的真實性、完整性及立場等,不負任何法律責任。而一切留言之言論只代表留言者個人意 見,並非本網站之立場,讀者及用戶不應信賴內容,並應自行判斷內容之真實性。於有關情形下,讀者及用戶應尋求專業意見(如涉及醫療、法律或投資等問題)。 由於本討論區受到「即時上載留言」運作方式所規限,故不能完全監察所有留言,若讀者及用戶發現有留言出現問題,請聯絡我們。Post76玩樂討論區有權刪除任何留言及拒絕任何人士上載留言 (刪除前或不會作事先警告及通知 ), 同時亦有不刪除留言的權利,如有任何爭議,管理員擁有最終的詮釋權 。用戶切勿撰寫粗言穢語、誹謗、渲染色情暴力或人身攻擊的言論,敬請自律。本網站保留一切法律權利。權利。
快速回復 返回頂部 返回列表